Foolproof Weekend Dessert – Easy No-Fail Sweet Treat
When the weekend arrives, many people crave something sweet and comforting to enjoy with family or friends. A foolproof dessert recipe is the perfect solution when you want something delicious without complicated techniques or hard-to-find ingredients. This simple dessert is designed to be reliable, beginner-friendly, and absolutely satisfying every time you make it.
Whether you’re planning a cozy family dinner, hosting guests, or simply treating yourself after a long week, a simple homemade dessert can turn an ordinary evening into something special. The beauty of this recipe lies in its ease: minimal preparation, basic pantry ingredients, and a creamy, layered texture that tastes like it came from a professional bakery.
This weekend dessert idea combines smooth cream, light sweetness, and a soft layered base that melts in your mouth. Because it requires no complicated baking steps, even beginner cooks can achieve perfect results. It’s also versatile—you can customize it with fruit, chocolate, or flavored syrups depending on your preferences.
Why This Dessert Is Perfect for the Weekend
A weekend dessert should be relaxing to prepare and enjoyable to eat. This recipe checks all the boxes.
1. Very Easy to Make
The recipe requires only a few simple steps. Even someone with little baking experience can make it successfully.
2. Uses Simple Ingredients
Most ingredients are common pantry items such as cream, sugar, vanilla, and biscuits or cake layers.
3. No Advanced Baking Skills Required
There are no complicated techniques like tempering chocolate or making custard from scratch.
4. Perfect for Gatherings
This dessert can easily serve several people, making it ideal for family dinners, celebrations, or weekend parties.
5. Customizable Flavors
You can easily adjust the flavor by adding berries, chocolate chips, caramel sauce, or nuts.
The Secret to a Foolproof Dessert
A truly foolproof dessert follows a few key principles.
Simple Ingredients
Using ingredients that behave predictably ensures reliable results every time.
Balanced Sweetness
The recipe avoids excessive sugar, allowing the natural flavors of cream and vanilla to shine.
Easy Layering
Layered desserts create a visually appealing presentation without requiring advanced decorating skills.
Proper Chilling Time
Allowing the dessert to chill in the refrigerator helps the layers set properly and enhances flavor.
Ingredients Overview
This dessert uses ingredients that are easy to find and inexpensive.
Heavy cream creates the creamy texture and rich taste.
Powdered sugar sweetens the dessert smoothly without graininess.
Vanilla extract adds warmth and depth of flavor.
Soft biscuits or cake layers provide structure and a pleasant texture contrast.
Fresh fruit or chocolate can be added for extra flavor and decoration.
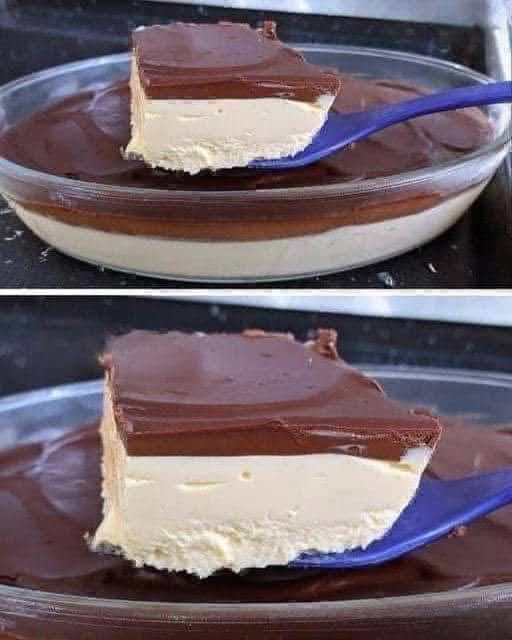
Step-by-Step Preparation Guide
Step 1: Prepare the Cream Filling
Start by pouring the heavy cream into a large mixing bowl. Using a hand mixer or whisk, beat the cream until it begins to thicken.
Gradually add powdered sugar and vanilla extract while continuing to mix. Beat until soft peaks form. The cream should be smooth, fluffy, and slightly firm.
This creamy mixture will form the base of the dessert and provide the rich, melt-in-your-mouth texture.
Step 2: Prepare the Base Layer
Arrange a layer of biscuits, graham crackers, or soft cake pieces at the bottom of a serving dish.
This layer absorbs some moisture from the cream and becomes soft and delicious after chilling.
For extra flavor, you can lightly brush the biscuits with milk or coffee.
Step 3: Add the Cream Layer
Spread a generous layer of whipped cream mixture over the biscuit base.
Use a spatula to smooth the surface evenly.
The cream layer should completely cover the biscuits so that every bite is creamy and balanced.
Step 4: Repeat the Layers
Add another layer of biscuits followed by another layer of cream.
Continue layering until the dish is filled, finishing with a thick layer of cream on top.
This layered method creates a beautiful dessert with a soft, delicate texture.
Step 5: Decorate the Dessert
Decorating the dessert makes it look even more tempting.
You can add:
- fresh strawberries
- blueberries
- chocolate shavings
- crushed cookies
- caramel drizzle
These toppings not only enhance appearance but also add extra flavor and texture.
Step 6: Chill Before Serving
Cover the dessert and refrigerate it for at least 3–4 hours, or preferably overnight.
Chilling allows the flavors to blend together and softens the biscuit layers, creating a smooth, cake-like consistency.
This step is essential for achieving the perfect texture.
Flavor Variations
One of the best things about this foolproof dessert is how easily it can be customized.
Chocolate Lovers Version
Add cocoa powder to the cream mixture or sprinkle chocolate chips between the layers.
Berry Delight
Use strawberries, raspberries, or blueberries between the layers for a refreshing fruity flavor.
Coffee Dessert
Dip the biscuits in coffee before layering for a subtle coffee flavor.
Nutty Crunch
Add crushed almonds, pistachios, or walnuts between the layers.
Tropical Flavor
Add mango slices or pineapple pieces for a tropical twist.
Tips for Perfect Results
Use Cold Cream
Cold cream whips faster and creates a fluffier texture.
Don’t Overbeat the Cream
Overbeating can turn cream grainy or buttery.
Chill Long Enough
The dessert tastes much better after chilling because the layers soften and blend.
Use a Clear Dish
A glass dish shows the beautiful layers and makes the dessert look more impressive.
Serving Suggestions
This dessert pairs wonderfully with many beverages and side treats.
Serve it with:
- freshly brewed coffee
- hot tea
- iced coffee
- cappuccino
You can also add a scoop of vanilla ice cream for an extra indulgent dessert experience.
Storage Tips
This dessert stores very well, making it ideal for preparing ahead of time.
Refrigerator:
Store covered for up to 3 days.
Freezer:
You can freeze it for up to 1 month, though the texture may become slightly firmer.
Allow frozen dessert to thaw in the refrigerator before serving.
Nutritional Information (Approximate per serving)
Calories: 280
Carbohydrates: 24 g
Protein: 4 g
Fat: 18 g
Sugar: 14 g
Fiber: 1 g
Nutritional values may vary depending on ingredients and toppings.
Why Homemade Desserts Are Better
Homemade desserts have several advantages compared to store-bought sweets.
They contain fewer preservatives, allow you to control sugar levels, and can be customized according to your taste preferences.
Making dessert at home also creates a warm, comforting experience that brings people together.
Final Thoughts
A foolproof weekend dessert should be simple, comforting, and delicious—and this recipe delivers exactly that. With creamy layers, soft texture, and endless flavor variations, it’s the kind of dessert you can make again and again without worry.
Whether you’re preparing it for a relaxed weekend evening, a family gathering, or a small celebration, this easy dessert will impress everyone while requiring very little effort.
Once you try this recipe, it may become your go-to sweet treat whenever the weekend arrives.
Simple Recipe
Prep Time: 15 minutes
Chill Time: 3–4 hours
Total Time: About 4 hours
Servings: 6–8
Ingredients
- 2 cups heavy cream
- ½ cup powdered sugar
- 1 teaspoon vanilla extract
- 2 cups biscuits or graham crackers
- 1 cup fresh berries or chocolate shavings (optional)
Instructions
- In a bowl, whip the heavy cream until it begins to thicken.
- Add powdered sugar and vanilla extract and beat until soft peaks form.
- Arrange a layer of biscuits in the bottom of a serving dish.
- Spread a layer of whipped cream over the biscuits.
- Repeat layers of biscuits and cream until the dish is full.
- Finish with a cream layer on top and decorate with berries or chocolate.
- Refrigerate for 3–4 hours before serving.
Temperature
No baking required. Chill in the refrigerator at 4°C / 39°F.
Nutrition (Per Serving)
Calories: 280
Carbohydrates: 24 g
Protein: 4 g
Fat: 18 g
Sugar: 14 g