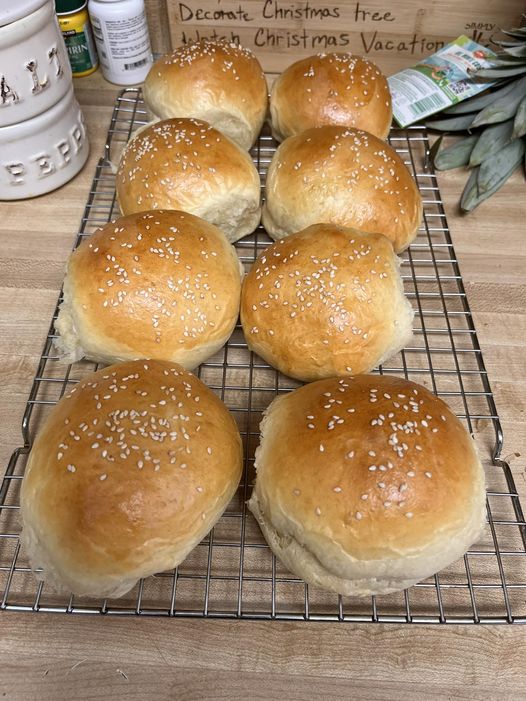
Gluten-Free Hamburger Buns
Soft, fluffy, and sturdy enough to hold all your favorite burger toppings, gluten-free hamburger buns are a must-have for anyone avoiding gluten but still craving a classic burger experience. Many store-bought gluten-free buns can be dry or crumbly, but making them at home gives you control over texture and flavor. This recipe produces tender buns with a light crumb, slightly golden crust, and enough structure to hold juicy burgers without falling apart.
Whether you’re grilling burgers for a summer barbecue or making a quick weeknight dinner, these gluten-free hamburger buns are easy to prepare and incredibly satisfying.
Why You’ll Love These Gluten-Free Hamburger Buns
There are several reasons why this recipe stands out from many gluten-free bread options:
Soft and fluffy texture: Gluten-free breads often struggle with texture, but the combination of gluten-free flour blend and binding ingredients creates a light, airy bun.
Holds together well: These buns are sturdy enough for burgers, sandwiches, or sloppy joes without crumbling.
Simple ingredients: Most ingredients are pantry staples for gluten-free baking.
Customizable: You can make them dairy-free, add seeds, or shape them into sandwich rolls.
Fresh taste: Homemade buns taste far better than many packaged gluten-free alternatives.
Ingredients
For the buns, you will need:
- 3 cups gluten-free all-purpose flour blend (with xanthan gum)
- 1 tablespoon instant yeast
- 2 tablespoons sugar
- 1 teaspoon salt
- 1 cup warm milk (or dairy-free milk)
- 2 tablespoons olive oil or melted butter
- 2 large eggs
- 1 teaspoon apple cider vinegar
Optional topping:
- 1 egg (for egg wash)
- Sesame seeds or poppy seeds
Equipment Needed
- Mixing bowl or stand mixer
- Measuring cups and spoons
- Baking sheet
- Parchment paper
- Kitchen towel
Step-by-Step Instructions
1. Activate the yeast
In a mixing bowl, combine the warm milk, sugar, and yeast. Stir gently and allow the mixture to sit for about 5 minutes until it becomes slightly foamy. This step ensures the yeast is active and will help the buns rise properly.
2. Mix the wet ingredients
Add the eggs, olive oil, and apple cider vinegar to the yeast mixture. Whisk until everything is well combined.
These ingredients help provide structure and moisture to gluten-free dough, which typically lacks elasticity.
3. Add the dry ingredients
In a separate bowl, combine the gluten-free flour blend and salt. Gradually add the dry ingredients to the wet mixture while mixing.
Use a stand mixer with a paddle attachment or a hand mixer. Gluten-free dough is usually softer and stickier than regular bread dough.
Mix for 3–4 minutes until the dough becomes smooth and thick.
4. Shape the buns
Line a baking sheet with parchment paper.
Using slightly wet hands or a large spoon, divide the dough into 6–8 portions. Shape each portion into a smooth round bun and place them on the baking sheet.
Leave space between each bun so they can expand while rising.
5. Let the buns rise
Cover the baking sheet with a clean kitchen towel and place it in a warm spot.
Allow the buns to rise for 30–40 minutes, or until they become noticeably puffier.
Unlike traditional wheat dough, gluten-free dough usually rises only once.
6. Preheat the oven
Preheat your oven to 375°F (190°C) while the buns finish rising.
7. Add topping (optional)
For a shiny bakery-style finish, brush the tops of the buns with a lightly beaten egg.
Sprinkle sesame seeds or poppy seeds on top if desired.
8. Bake the buns
Bake the buns in the preheated oven for 18–22 minutes, or until the tops are golden brown.
The buns should feel firm and sound slightly hollow when tapped.
9. Cool before slicing
Allow the buns to cool on a wire rack for at least 20 minutes before slicing. This helps the interior structure set and prevents crumbling.
Nutritional Information (Approximate per bun)
- Calories: 210
- Carbohydrates: 30 g
- Protein: 5 g
- Fat: 7 g
- Fiber: 2 g
- Sugar: 4 g
Values may vary depending on the flour blend used.
Tips for Perfect Gluten-Free Hamburger Buns
Use a high-quality gluten-free flour blend
Not all blends behave the same. Look for one that includes rice flour, potato starch, and tapioca starch.
Don’t skip the vinegar
Apple cider vinegar improves the texture and helps the yeast work more effectively.
Keep the dough moist
Gluten-free dough dries out faster than regular dough. If it seems too thick, add a tablespoon of milk.
Use wet hands when shaping
This prevents the sticky dough from sticking to your hands.
Check your yeast temperature
Milk should be warm but not hot (about 105–110°F / 40–43°C).
Serving Ideas
These gluten-free buns are versatile and can be used in many ways.
Classic burgers:
Serve with grilled beef patties, lettuce, tomato, cheese, and your favorite sauces.
Chicken sandwiches:
Perfect for crispy chicken or grilled chicken breast sandwiches.
Breakfast sandwiches:
Add scrambled eggs, bacon, and cheese for a hearty breakfast.
Pulled meat sandwiches:
Use them for pulled chicken or shredded beef sandwiches.
Storage Tips
Room temperature:
Store the buns in an airtight container for up to 2 days.
Refrigerator:
They can last up to 5 days, though they may become slightly firmer.
Freezer:
Freeze the buns for up to 3 months. Slice them before freezing so you can easily toast them later.
To reheat, simply toast or warm them in the oven for a few minutes.
Variations
Dairy-free version
Use almond milk, oat milk, or soy milk instead of regular milk.
Vegan version
Replace eggs with flax eggs (1 tablespoon ground flaxseed + 3 tablespoons water per egg).
Seeded buns
Mix sunflower seeds or flax seeds into the dough for added nutrition.
Mini slider buns
Divide the dough into smaller portions to create slider-size buns.