Classic Homemade Peanut Butter Cups
If you love the irresistible combination of chocolate and peanut butter, Classic Homemade Peanut Butter Cups are a must-try treat. These delightful candies feature a creamy, slightly sweet peanut butter filling wrapped in a rich chocolate shell. They’re simple to make, require only a handful of ingredients, and taste even better than store-bought versions.
Homemade peanut butter cups are perfect for holiday desserts, party treats, edible gifts, or simply satisfying a sweet craving. The best part is that you can control the ingredients, sweetness level, and chocolate quality, creating a dessert that suits your taste perfectly.
In this detailed guide, you’ll learn how to make smooth and creamy peanut butter cups from scratch, along with preparation tips, melting temperatures for chocolate, storage instructions, and nutritional information.
Why You’ll Love This Recipe
There are many reasons why homemade peanut butter cups have become a favorite dessert for so many people.
Simple ingredients: You only need a few pantry staples to make them.
Quick preparation: The recipe comes together in under 30 minutes.
No baking required: Everything sets in the refrigerator.
Customizable: You can use dark chocolate, milk chocolate, or even white chocolate.
Perfect for gifting: These treats look beautiful in dessert boxes or holiday tins.
Ingredients
This recipe makes approximately 12 standard peanut butter cups.
Chocolate Layer
- 2 cups semi-sweet chocolate chips (or chopped chocolate)
- 1 tablespoon coconut oil or butter
Peanut Butter Filling
- ¾ cup creamy peanut butter
- 2 tablespoons unsalted butter (softened)
- ½ cup powdered sugar
- ½ teaspoon vanilla extract
- ¼ teaspoon salt
Optional additions:
- Crushed graham crackers
- Sea salt flakes
- Mini chocolate chips
- Crushed pretzels
Equipment Needed
- Muffin tin or silicone cupcake mold
- 12 cupcake liners
- Microwave-safe bowl or double boiler
- Mixing bowl
- Spoon or small spatula
Preparation Time
- Prep time: 15 minutes
- Chilling time: 30–45 minutes
- Total time: about 1 hour
Step-by-Step Instructions
Step 1: Prepare the Muffin Tray
Line a 12-cup muffin tin with cupcake liners.
This will help the peanut butter cups maintain their shape and make them easier to remove once set.
Set the tray aside.
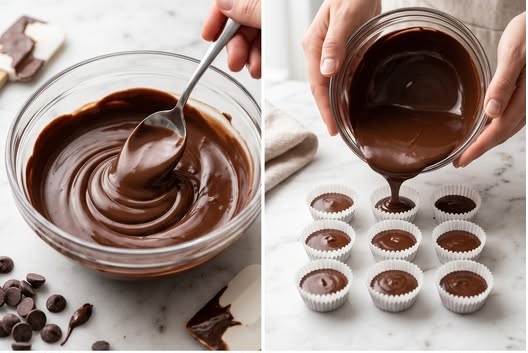
Step 2: Melt the Chocolate
You can melt the chocolate using either the microwave or a double boiler.
Microwave Method
- Place chocolate chips and coconut oil in a microwave-safe bowl.
- Microwave for 30 seconds.
- Stir thoroughly.
- Continue heating in 15–20 second intervals, stirring between each interval until smooth.
Temperature Tip
Chocolate melts best between:
86°F – 90°F (30°C – 32°C) for smooth texture without burning.
Avoid overheating, as chocolate can seize and become grainy.
Step 3: Create the First Chocolate Layer
Spoon 1 tablespoon of melted chocolate into each cupcake liner.
Gently tilt or tap the tray so the chocolate spreads evenly across the bottom.
Place the tray in the refrigerator for 10 minutes so the chocolate can firm up slightly.
Step 4: Prepare the Peanut Butter Filling
In a medium mixing bowl combine:
- Peanut butter
- Softened butter
- Powdered sugar
- Vanilla extract
- Salt
Mix until smooth and creamy.
The mixture should be thick but soft enough to scoop.
If the mixture feels too sticky, add a little more powdered sugar.
Step 5: Shape the Filling
Take about 1 tablespoon of peanut butter mixture and roll it into a small disk shape.
Place the peanut butter disk in the center of each chocolate base.
Press gently so it spreads evenly but does not touch the edges.
Leaving a small chocolate border around the filling helps seal the cups later.
Step 6: Add the Top Chocolate Layer
Spoon another 1 tablespoon of melted chocolate over the peanut butter filling.
Use the back of the spoon to spread the chocolate evenly so the filling is fully covered.
Lightly tap the muffin tray on the counter to smooth the tops.
Optional: sprinkle sea salt flakes on top before the chocolate sets.
Step 7: Chill the Peanut Butter Cups
Place the tray in the refrigerator and chill for 30–45 minutes until the chocolate is completely firm.
For faster setting, you can place them in the freezer for 15 minutes.
Once firm, remove the liners and enjoy.
Tips for Perfect Peanut Butter Cups
Use good-quality chocolate
Higher-quality chocolate melts better and gives a smoother finish.
Don’t overfill
Too much peanut butter filling can make it difficult to seal the chocolate layer.
Keep chocolate warm
If your melted chocolate thickens while working, warm it again for 10 seconds.
Use silicone molds
Silicone molds produce smoother and more professional-looking cups.
Delicious Variations
Dark Chocolate Peanut Butter Cups
Replace semi-sweet chocolate with 70% dark chocolate for a richer flavor.
Crunchy Peanut Butter Cups
Use crunchy peanut butter instead of creamy for added texture.
Keto Peanut Butter Cups
Substitute powdered sugar with:
- powdered erythritol
- monk fruit sweetener
Use sugar-free chocolate chips.
Stuffed Peanut Butter Cups
Add extra fillings such as:
- caramel
- chopped nuts
- cookie crumbs
- mini marshmallows
Storage Instructions
Refrigerator
Store peanut butter cups in an airtight container in the refrigerator for up to 2 weeks.
Freezer
They freeze very well.
- Place them in a sealed container.
- Separate layers with parchment paper.
They can be stored frozen for up to 3 months.
Let them sit at room temperature for 5–10 minutes before eating.
Nutritional Information (Per Peanut Butter Cup)
Approximate values based on standard ingredients.
- Calories: 180 kcal
- Protein: 4 g
- Carbohydrates: 16 g
- Sugar: 13 g
- Fat: 12 g
- Saturated Fat: 6 g
- Cholesterol: 5 mg
- Sodium: 85 mg
Values may vary depending on chocolate type and peanut butter brand.
Why Chocolate and Peanut Butter Work So Well
The pairing of chocolate and peanut butter is one of the most beloved flavor combinations in desserts.
Sweet and salty balance
Peanut butter’s natural saltiness perfectly balances chocolate’s sweetness.
Creamy and smooth texture
The soft peanut butter filling contrasts beautifully with the firm chocolate shell.
Rich flavor
Both ingredients are naturally rich, creating a deeply satisfying dessert.
Serving Ideas
Homemade peanut butter cups are incredibly versatile and can be served in many ways.
Dessert platters
Add them to cookie trays or dessert boards.
Holiday treats
Perfect for Christmas, Halloween, or Easter candy boxes.
Lunchbox treats
Kids and adults love finding them in lunchboxes.
Ice cream topping
Chop them and sprinkle over vanilla ice cream.
Common Mistakes to Avoid
Overheating chocolate
This can cause chocolate to become thick and unusable.
Too-soft peanut butter filling
If the filling is too soft, the cups may collapse.
Skipping the chilling step
The first chocolate layer must firm up before adding the filling.
Frequently Asked Questions
Can I make mini peanut butter cups?
Yes. Use a mini muffin tin and reduce the filling to about 1 teaspoon per cup.
Chilling time remains the same.
Can I make these dairy-free?
Yes. Use:
- dairy-free chocolate
- coconut oil instead of butter
Can I use natural peanut butter?
Yes, but stir it well first. Natural peanut butter tends to separate.
Final Thoughts
Classic Homemade Peanut Butter Cups are one of the easiest and most satisfying homemade desserts you can make. With their smooth chocolate coating and creamy peanut butter center, they deliver a perfect balance of flavors and textures in every bite.
They require minimal ingredients, no baking, and very little preparation time, making them ideal for beginner cooks and experienced bakers alike.
Once you try making peanut butter cups at home, you may never want to buy store-bought versions again. They’re fresher, richer, and easily customizable to suit your preferences.