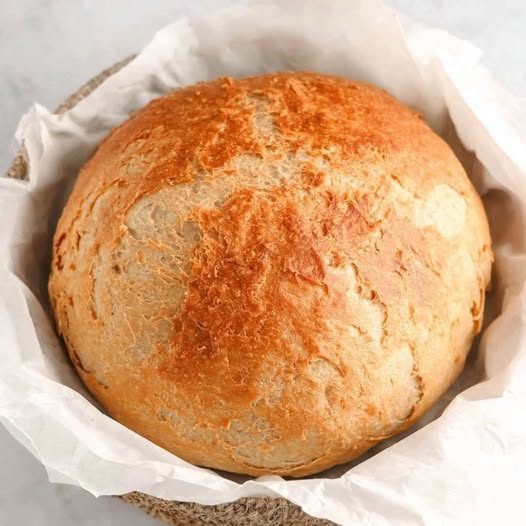
No Kneading, No Eggs, No Butter Bread
A Simple, Soft Homemade Bread Anyone Can Make
Homemade bread doesn’t always require complicated steps, expensive ingredients, or hours of kneading. This No Kneading, No Eggs, No Butter Bread recipe is perfect for beginners and busy home bakers who want soft, fluffy bread with minimal effort. Using just a few basic pantry ingredients—flour, yeast, water, sugar, salt, and oil—you can create a beautiful loaf that is light, airy, and delicious.
This bread is incredibly versatile. It can be used for sandwiches, toast, dipping in soups, or simply enjoyed warm with jam or honey. Because it contains no eggs or butter, it’s also suitable for those who avoid these ingredients while still producing a tender crumb and golden crust.
In this detailed guide, you’ll learn everything about making this simple bread, including preparation tips, proofing time, baking temperature, storage methods, and nutritional information.
Why You’ll Love This Bread
There are many reasons why this recipe has become popular among home bakers.
No kneading required
You don’t need to spend time kneading dough. The yeast and resting time develop the structure naturally.
Minimal ingredients
Everything used in this recipe is commonly found in most kitchens.
Beginner-friendly
Even if you’ve never made bread before, this recipe is easy to follow.
Soft and fluffy texture
Despite the simplicity, the bread turns out tender and airy.
Versatile
You can shape it into loaves, rolls, or rustic artisan-style bread.
Ingredients
This recipe makes 1 medium loaf or 8–10 bread rolls.
- 3 cups all-purpose flour (360 g)
- 1 teaspoon salt
- 1 tablespoon sugar
- 1 teaspoon instant yeast
- 1 cup warm water (240 ml)
- 2 tablespoons vegetable oil or olive oil
Optional additions:
- 1 tablespoon sesame seeds
- 1 tablespoon sunflower seeds
- ½ teaspoon garlic powder
- dried herbs such as oregano or thyme
Equipment Needed
- Large mixing bowl
- Wooden spoon or spatula
- Loaf pan or baking tray
- Kitchen towel or plastic wrap
- Oven
Preparation Time
- Prep time: 10 minutes
- First rise: 1 hour
- Second rise: 20–30 minutes
- Baking time: 25–30 minutes
Total time: about 1 hour 45 minutes
Step-by-Step Instructions
Step 1: Activate the Yeast
In a large mixing bowl combine:
- Warm water (about 105–110°F / 40–43°C)
- Sugar
- Instant yeast
Stir gently and allow it to sit for 5–10 minutes.
The mixture should become slightly foamy, which indicates the yeast is active.
Step 2: Mix the Dough
Add to the yeast mixture:
- Flour
- Salt
- Oil
Mix everything using a wooden spoon or spatula until a sticky dough forms.
Because this is a no-knead dough, it will look wetter than traditional bread dough. This is normal and helps create a soft crumb.
Step 3: First Rise (Fermentation)
Cover the bowl with a clean kitchen towel or plastic wrap.
Let the dough rise in a warm place for 1 hour or until it doubles in size.
The yeast will produce gases that create air pockets, giving the bread its soft texture.
Step 4: Shape the Dough
Lightly flour your hands and gently fold the dough a few times to release excess air.
Shape the dough into:
- a loaf
- a round rustic bread
- small rolls
Place the shaped dough into a lightly greased loaf pan or baking tray.
Step 5: Second Rise
Cover the shaped dough again and let it rise for 20–30 minutes.
During this time the dough will expand again and become lighter.
Step 6: Preheat the Oven
Preheat your oven to:
375°F (190°C)
Preheating ensures the bread bakes evenly and rises properly in the oven.
Step 7: Bake the Bread
Place the bread in the center rack of the oven and bake for:
25–30 minutes at 375°F (190°C)
The bread is ready when:
- The top is golden brown
- The loaf sounds hollow when tapped
- Internal temperature reaches 190–200°F (88–93°C)
Step 8: Cool Before Slicing
Remove the bread from the oven and allow it to cool on a wire rack for 15–20 minutes.
Cooling helps the crumb set and prevents the bread from becoming gummy when sliced.
Tips for Perfect No-Knead Bread
Use warm water
Water that is too hot can kill the yeast. The ideal temperature is 105–110°F (40–43°C).
Do not add too much flour
A slightly sticky dough creates softer bread.
Let the dough rise fully
Under-proofed dough may produce dense bread.
Bake until golden
Proper baking gives the bread a delicious crust.
Variations
Whole Wheat Version
Replace half of the all-purpose flour with whole wheat flour.
You may need to add 2–3 tablespoons extra water because whole wheat flour absorbs more liquid.
Herb Bread
Add:
- 1 teaspoon dried oregano
- ½ teaspoon rosemary
- ½ teaspoon garlic powder
This version pairs beautifully with soups and pasta dishes.
Seeded Bread
Before baking, sprinkle the top with:
- sesame seeds
- sunflower seeds
- flaxseeds
This adds texture and nutritional value.
Rustic Artisan Style
Instead of a loaf pan, shape the dough into a round ball and bake it on a baking sheet or pizza stone.
You can also score the top with a knife to create decorative patterns.
Storage Instructions
Room Temperature
Store bread in a sealed container or bread bag for 2–3 days.
Avoid refrigeration because it can dry out the bread.
Freezing
Bread freezes well for up to 2 months.
To freeze:
- Slice the bread first.
- Wrap slices in plastic wrap or freezer bags.
This allows you to thaw individual slices when needed.
Reheating Bread
To refresh bread:
- Oven: 350°F (175°C) for 5–7 minutes
- Toaster: great for slices
- Air fryer: 320°F (160°C) for 3 minutes
These methods help restore freshness.
Nutritional Information (Per Slice)
Based on 10 slices per loaf.
- Calories: 150 kcal
- Carbohydrates: 27 g
- Protein: 4 g
- Fat: 3 g
- Fiber: 1 g
- Sugar: 2 g
- Sodium: 150 mg
Values may vary depending on flour type and oil used.
Health Benefits of Homemade Bread
Fewer preservatives
Homemade bread contains fewer additives compared to many store-bought breads.
Customizable ingredients
You can choose whole grains, seeds, or lower sodium options.
Fresh flavor
Freshly baked bread has a superior aroma and taste.
Budget-friendly
Making bread at home often costs significantly less than bakery bread.
What to Serve With This Bread
This soft bread pairs well with many meals.
Breakfast
- Toast with butter or jam
- Peanut butter and honey
Lunch
- Sandwiches
- Grilled cheese
Dinner
- Soup and stew
- Pasta dishes
- Olive oil and herbs for dipping
Common Mistakes to Avoid
Using inactive yeast
Always check that the yeast foams during activation.
Skipping rise time
The rise is essential for light and airy bread.
Baking in a cold oven
A fully preheated oven is critical for good results.
Frequently Asked Questions
Can I make this bread without sugar?
Yes. Sugar helps activate yeast but can be replaced with honey or maple syrup, or omitted if necessary.
Can I use bread flour instead of all-purpose flour?
Yes. Bread flour will create slightly chewier bread because it has higher protein.
Why is my bread dense?
Possible reasons include:
- insufficient rising time
- too much flour
- expired yeast
Final Thoughts
This No Kneading, No Eggs, No Butter Bread proves that homemade bread can be simple, affordable, and incredibly delicious. With just a few basic ingredients and minimal effort, you can enjoy fresh, soft bread straight from your own kitchen.
Whether you’re new to baking or simply want an easy bread recipe that works every time, this method delivers consistent results. The bread is soft enough for sandwiches, flavorful enough to serve with dinner, and satisfying enough to enjoy on its own.