Homemade Gluten-Free Bread
Soft, Fluffy, and Perfect for Sandwiches
If you follow a gluten-free lifestyle, finding a good bread recipe can sometimes be challenging. Many store-bought gluten-free breads are dense, dry, or crumbly. The good news is that making homemade gluten-free bread is easier than you might think, and the results are often much better than packaged versions.
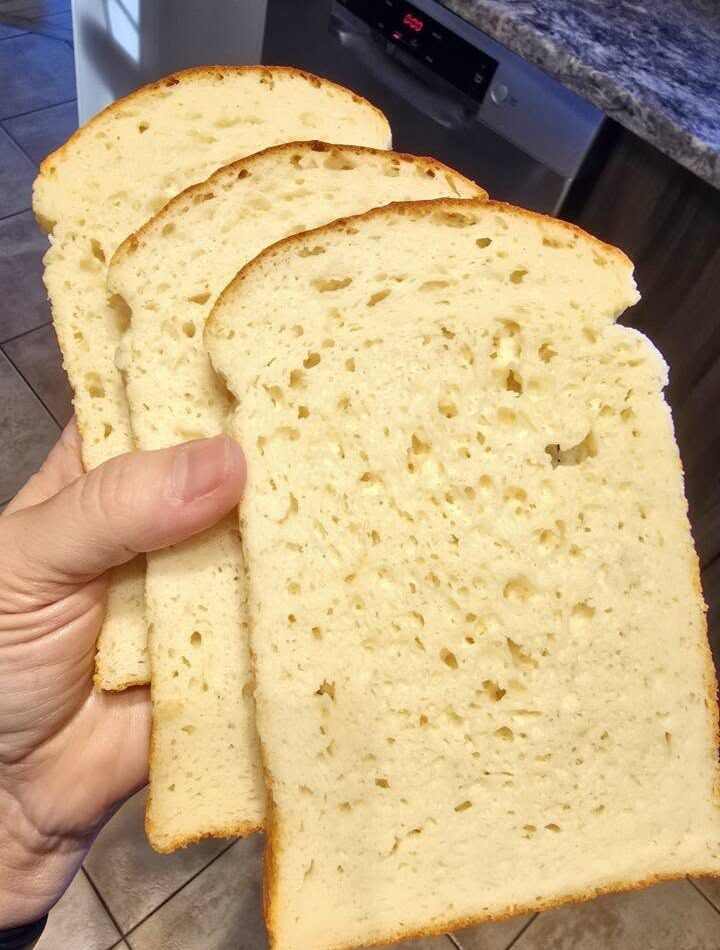
This recipe produces a loaf that is soft, fluffy, and slightly chewy, making it perfect for sandwiches, toast, or everyday meals. By using a balanced blend of gluten-free flours along with yeast and a few simple ingredients, you can create bread that rises beautifully and has a wonderful texture.
Whether you are avoiding gluten because of celiac disease, gluten intolerance, or personal dietary choices, this homemade bread recipe allows you to enjoy fresh, delicious bread without wheat.
Why Make Gluten-Free Bread at Home?
Many people who follow gluten-free diets rely on store-bought bread, but homemade bread offers several advantages.
Better Texture and Flavor
Freshly baked gluten-free bread is softer and tastes much better than many commercial options.
Simple Ingredients
When you bake at home, you control the ingredients and avoid preservatives or additives.
Cost Effective
Gluten-free bread can be expensive in stores, but baking it yourself can save money.
Customizable
You can adjust the recipe by adding seeds, herbs, or whole grain gluten-free flours.
What Makes Gluten-Free Bread Different?
Traditional bread relies on gluten, a protein in wheat that helps dough stretch and trap air during rising. Without gluten, bread can become dense or crumbly.
To solve this problem, gluten-free bread recipes typically include binding agents such as:
- Xanthan gum
- Psyllium husk
- Guar gum
These ingredients help mimic the elasticity of gluten and improve the bread’s structure.
Key Ingredients for Gluten-Free Bread
Each ingredient in gluten-free bread plays an important role in creating a soft, airy loaf.
Gluten-Free Flour Blend
A combination of rice flour, potato starch, and tapioca starch works well to create a balanced texture.
Yeast
Yeast allows the dough to rise and gives the bread a light texture.
Warm Water
Warm liquid activates the yeast and hydrates the flour mixture.
Sugar or Honey
A small amount of sugar helps feed the yeast and improves flavor.
Olive Oil
Oil adds moisture and helps keep the bread soft.
Eggs
Eggs provide structure and help hold the loaf together.
Xanthan Gum
This acts as a binding agent, replacing gluten’s elasticity.
Salt
Salt enhances flavor and balances the sweetness.
Tips for Perfect Gluten-Free Bread
Making gluten-free bread requires slightly different techniques than regular bread baking.
Use a Good Flour Blend
A high-quality gluten-free flour mix improves both flavor and texture.
The Dough Will Be Sticky
Unlike traditional bread dough, gluten-free dough is usually thicker and more like batter.
Use a Loaf Pan
Gluten-free bread spreads easily, so baking in a loaf pan helps maintain shape.
Allow Proper Rising Time
Letting the dough rise fully creates a lighter texture.
Preparation Time
- Prep Time: 15 minutes
- Rise Time: 45–60 minutes
- Baking Time: 40 minutes
- Total Time: About 1 hour 40 minutes
Ingredients
- 3 cups gluten-free all-purpose flour blend
- 1 teaspoon xanthan gum (if not included in flour blend)
- 2 teaspoons active dry yeast
- 1 tablespoon sugar or honey
- 1 teaspoon salt
- 1¼ cups warm water (110°F / 43°C)
- 2 tablespoons olive oil
- 2 large eggs
Optional additions:
- 2 tablespoons sunflower seeds
- 1 tablespoon chia seeds
- 1 tablespoon sesame seeds
Instructions
Step 1: Activate the Yeast
In a small bowl, combine warm water, sugar, and yeast. Stir gently and let the mixture sit for 5–10 minutes until it becomes foamy.
Step 2: Mix the Dry Ingredients
In a large mixing bowl, whisk together gluten-free flour, xanthan gum, and salt.
Step 3: Add Wet Ingredients
Add the yeast mixture, eggs, and olive oil to the flour mixture. Mix well until a thick batter-like dough forms.
You can mix with a wooden spoon or use a stand mixer for 3–4 minutes.
Step 4: Transfer to Loaf Pan
Grease a standard 9×5 inch loaf pan and transfer the dough into the pan. Smooth the top with a spatula.
Step 5: Let the Dough Rise
Cover the pan with a towel and allow the dough to rise in a warm place for 45–60 minutes, or until it increases in size.
Step 6: Preheat the Oven
Preheat the oven to 375°F (190°C).
Step 7: Bake the Bread
Bake for 35–40 minutes until the top is golden brown and the loaf sounds hollow when tapped.
Step 8: Cool Before Slicing
Remove the bread from the pan and allow it to cool on a wire rack for at least 30 minutes before slicing.
Serving Suggestions
This gluten-free bread is versatile and can be used in many ways.
Toast with Butter
Lightly toast slices and spread with butter or jam.
Sandwich Bread
Use for sandwiches with vegetables, cheese, or meats.
Avocado Toast
Top with mashed avocado, salt, and pepper.
Breakfast Toast
Serve with peanut butter and banana slices.
Storage Tips
Room Temperature
Store the bread in an airtight container for 2 days.
Refrigerator
Keeps fresh for up to 5 days.
Freezer
Slice the bread and freeze for up to 3 months.
Nutritional Information (Per Slice – Approximate)
- Calories: 150
- Carbohydrates: 26 g
- Protein: 4 g
- Fat: 4 g
- Fiber: 2 g
- Sugar: 2 g
- Sodium: 180 mg
Why This Gluten-Free Bread Recipe Works
This recipe combines a balanced gluten-free flour blend with eggs, yeast, and xanthan gum to create a loaf that rises well and holds together beautifully. The olive oil adds moisture, while proper proofing helps the bread develop a light, fluffy structure.
The result is a loaf of soft homemade gluten-free bread that is perfect for toast, sandwiches, or everyday meals.